Tuesday, 26 February 2013

Visible Images - Max


I thought I would make a tag for a change, and a boy/grungy one!  I coloured Max in using my pens and then cut him out.  I stamped the metal plate background over the whole tag - as the stamp is clear acrylic it is easy to line up to get a repeating pattern.  The tag was distressed and inked round with black soot distress ink.  I die cut the clock and fence using grunge paper, and then coloured them using black soot and silver alchol ink.  The metal tag was embossed and covered with the same alcohol ink, and gently sanded.  I added some stickers to it and dabbed black soot distress ink over it.  Finally the seam binding was distressed with black soot and the tag tied through it.

Supplies: 
Sentiment: Tim Holtz chit chat stickers
Colouring medium: promarkers 
Skin: coral sunkissed pink, blush, ivory, pastel pink 
Hair: Warm grey 1-5
 Clothes: midnight blue, twilight sky, grey green, soft aqua
black, cool grey 2-5, ice grey 1,2
Papers: 


Monday, 25 February 2013

Bookmarker's

Hi everyone its Erin Here 
ive got two Book Marker's for you ...


Jasper - By Kanban 

Queen of Heart's - Karber 


Here is the Tutorial  on how to make a Corner BookMarker 

Hugs Erin 

Friday, 22 February 2013

More Visible Images stamps

I am loving these Visible Image stamps - and Molly is so like my younger daughter!!  Most of her Barbie dolls are headless!!!  I coloured her using my pens and then created a stippled background.  I went for quite muted papers and backed them onto dark cardstock.  I die cut the flowers and attached brads to their centres.  I added some lace and thin satin ribon, and a bow, charm and button.  Finally a swirl and the sentiment which I stamped directly onto the dp.

Supplies
Sentiment: Kraftin Kimmie Wednesday
Colouring medium: promarkers 
Skin: coral,sunkissed pink, blush, ivory, pastel pink 
Hair: aubergine, purple, orchid, lavendar
 Clothes:aubergine, purple, orchid, lavendar, cool grey 1-5, black
 Papers: MME Fiddlesticks

Thursday, 21 February 2013

Knit one, purl one

Lisa has started stocking a range of crafts other than papercrafting.  So there are some fab jelly rolls available and some gorgeous wool.

I made a simple A6 notebook cover using some wool, and a simple knit and purl pattern top create the basketweave effect.  I lined the cover in white felt, making slips for the outer part of the notebook to slide into so the cover can be taken off and re-used when the book is full.  I crotcheted the loop, and added a button.

Everything can be bought from Lisa, including the felt and crotchet hook.

Tuesday, 19 February 2013

Visible image stamps ...

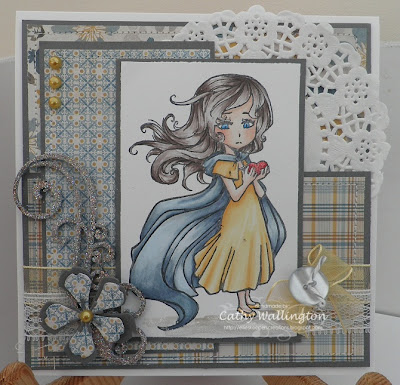
Lisa is going to be stocking these fabulous Visible Image stamps soon - this one is called Isabella, and she was a dream to colour. Having coloured her with my pens, I stitched the MME dp and added a doily, some lace and organza ribbon and a bow.  The mdf swirl has been glamour dusted, and I added a layered flower and pearls.  Finally I added a button with twine tied through it to the bow centre.


Supplies
Sentiment: 
Colouring medium: promarkers 
Skin: sunkissed pink, blush, ivory, pastel pink 
Hair: Warm grey 1-5
Clothes: midnight blue, twilight sky, grey green, cool aqua
gold, mustard, pastel yellow,buttercup
Papers: MME Oliver

Altered Suitcase

 Lisa has a fabulous range of alterable items in the shop, and the little suitcases are gorgeous!
Here is what i did with mine ...


 And this is how I did it ...

I am a cheapskate and won't pay for patterned  tissue paper so I make my own.  So all you need is white tissue paper, your alterable, stamps, inks and embellishments.

 Before I started I carefully peeled the straps back using a craft knife - this just makes it easier to cover the case.

 I used archival black and sepia inks and stamped all over the tissue paper with stamps.  I used Stampers Anonymous Air Travel set.  You need to be patient at this point and let the ink dry thoroughly.

 Once the ink was dry I covered the suitcas with PVA glue and then eased the tissue paper over.  It doesn't need to be very smooth, a few creased helps with the aged look!  You need to cut into the sides to allow the paper to fold .


Once you have covered it and the tissue is dry, glue the straps back down.


Now to age it up - I used vintage photo distress ink and rubbed it all over the suitcase, but not over the straps.

 The straps were covered in walnut stain distress ink to add a bit of a contrast.


And finally I decorated it with more stamps and tickets.

Monday, 18 February 2013

Creating your own papers using acrylic paints

I saw an article on gelli plates and thought I could create the same effect on my craft mat, and make my own papers ...

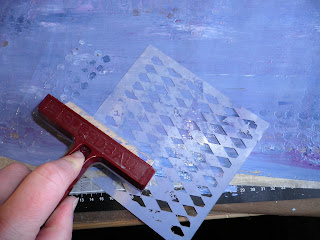
You need a craft sheet, brayer, and acrylic paints, I used dabbers and took the lids off, squeezing the paint onto the mat.
So first you nee to squeezre some paint onto your mat - don't put too much on or you will have a really thick layer of paint, and it will take longer to dry.
 Using your brayer smooth the paint out - roll in different directions to mix the paint and create the effect you want.
Now you need stensils, sequin waste, stamps,  bubble wrap - anything that will make an impression in the paint.  Stamp into the paint, and brayer over masks so you get the pattern impressed into the paint.
 It should look something like this ...
Once you are happy with it get your paper (I used A3 copier paper) and place it over the top.  Firmly pat and press the paper down - do not rub or you will rub the patterns out.  Carefully life the paper up and let it dry.

You should end up with papers like this ...
Now to use it!
I love these alterable files and thought I would se the paper to create a decopatch effect for my file.
 Simply tear your papers into peices ...
And then randomly cover the file with them.  I like the edges to be neat so I make sure there is enough to fold over the edges.
I use PVA glue and am very generous with it!!  Once I have covered the file I mix up a wash of PVA and water and cover the file with it - this makes sure all the ton edges are stuck down, nd gives the paper a nice sheen.

Finally I decorated it ...
I cut the Weathered clock, butterflies and tattered flower out of grungepaper and stained it using dylusions crushed grape and fresh lime sprays.  While it was drying, I spritzed the inks over the file to add another layer of colour.  I also added some frantage to it.  Once everything was dry I put the diecuts on using glossy accents and added pearls to the butterflies and a big button to the flower.

Sunday, 17 February 2013

Aperture Card Tutorial

The first time I decided to try making this kind of aperture card it was for a Sugar Plum fairy ballerina card where I knew I wanted the dancer to look like one of those ballerina's you get in music boxes but wasn't quite sure how to achieve it!

Well, second time around I think I have perfected the technique so I wanted to share it with you all AND show off some of the scrummy bits Lisa has in the shop for you!


First off I covered a 6"x6" card blank with patterned paper
I have used papers from Tigerlilly by Kaisercraft for this project

   
 Then I offered up my die (Spellbinders Floral Ovals) to get the best placement

Opening up my card blank I cut out my aperture (using my Big Shot) - keep the cut out, you might want to use it later!

Then cut a corresponding aperture into some patterned paper

For my image I stamped my image (Pippi Longstockings from Sugar Nellie) twice onto card and then traced the image onto the back of the card to form a mirror image (if you are using a digital image you can flip your image over in a picture editing program)
I then coloured them in to match using Promarkers and Flexmarkers

I then cut the images out - taking care to make sure they cut out as similarly as possible
I also added Stickles to the wings at this point
As you can see, I have stuck the cut out from the front of the card on the inside

Cut a length of clear plastic wire - you can use twine or other wire to suit the card you're making
I went for clear so that she'd look like she was flying

Using double sided sticky tape stick the wire down to the card blank and then cover with the patterned paper

Again using double sided sticky tape, stick your image first to one side of the wire...

... and then the other (as well as the back of the front image)
I have added some of the sentiment die cuts from the co-ordinating Tigerlilly Collectables

And then decorate to finish!
I have added another Tigerlilly Collectables sentiment die cut as well as some super cute mesh butterflies

Everything is available from Lisa - either to buy right now or to put on order

I hope you found this tutorial useful, and it would be great if you shared any aperture cards you make with us on our facebook page

Wednesday, 6 February 2013

Metal Tag in Lilac!!!!

Hi all, just popped on to show you some more inspiration with Paperartsy stamps which you can find here in the shop.  I used paperartsy metal that is back with card and cut a tag with Tim Holtz Sizzix tag die.  I then covered it with crackle medium and when dry painted it lilac, and as you can see the metal shining through in the cracks.  I stamped with flower, then stamped again on card I had swooshed in some lilac and darker lilac paint, cut out and decoupaged on top :-)


I matted on black card and then with a pencil dipped in lilac paint I put dots all around. Shall be back with more over the next few days.
Happy Crafting :-)
Kerry xxx

Friday, 1 February 2013

Stepper card tutorial

I love making different shaped cards, and this stepper card is a fun one to make.  You don't need to buy or download a template, sa they are really easy to make, and you can adjust the sizings to suit the card you are making.

Here is my template - I use a 26cm x 18cm rectangle as my card base.
 I measure 6cm in from the long side, and 3cm in from the short sides and create my cut and fold lines.  The long line is cute, the others are scored and folded.

So when it is cut and folded it should look like this.  I score my cardstock using a score board (Lisa stocks Hougie boards) and I score on both sides, as it seems to make a neater crease and fold.

So now all you need to do is fold the card to make the stepper shape ...

You will need to firmly score over the folds to make the 'peaks' crisp so they do slide back.  Once theis is done, you will need to decide which side the tall part of your step is gonig to be.

I coloured this fab  Saturated Canary stamp, Valentine Petals, using my promarkers.

 I matted the design papers, My Minds Eye Lost and Found and First Edition Summer Breeze, up onto kraft cardstock.
 Finally I added some ribbon, Memory box hearts and flowers, and some pearls.  The sentiment was stamped onto the deisgn paper, and it is from the same stamp set as the iamge.
I hope you find this tutorial useful, and if you make any stepper cards it would be great if you shared them on our facebook page.